A Happy Hive

The best in savings, home, food and travel

  • Savings
  • Home
  • Food
  • Travel
  • Savings
    • Grocery
    • Print Coupons
  • Your Home
    • Chicken Coops
    • Gardening
  • Food
  • Travel
  • Earn Money
  • Rise & Shine
  • About
  • Contact Us

How to Clean Stained Cutting Board {Naturally}

Shared June 18, 2016

Clean-a-stained-cutting-board

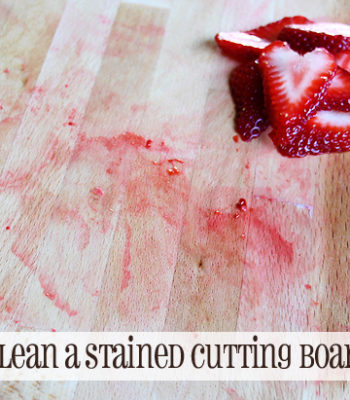
I have a nice big wooden cutting board. I LOVE this cutting board so I was super bummed when I stained it cutting strawberries for dehydrating. I should have used a plastic cutting board, but I didn’t even think about it. I should have cleaned it up right away, but I didn’t. So how do you get stains out of a cutting board?

I tried cleaning the stained cutting board with a hot dish cloth and it barely made a dent. Since it’s a food surface I didn’t want to use anything toxic. I found a combination of lemon, salt and baking soda worked pretty great.

How to Clean Stained Cutting Board {Naturally}
 
Save Print
Author: Heather
Recipe type: Other
Ingredients
  • Coarse, rock salt (that means big chunky salt. If you don’t have this, regular salt will probably work).
  • Baking soda
  • Lemon, probably only need half of a lemon
Instructions
  1. First sprinkle salt on top of the stain. Using a lemon half scrub the salt. This will release lemon juice onto the stain and the salt will start to “scratch” away the stain. Add more salt and keep scrubbing if needed. For more abrasion you can use a toothbrush (a clean one) or a scrub brush. Be careful for things like steel wood that could damage the wood.
  2. Then sprinkle baking soda over the stain. It will bubble from the lemon juice (exciting, right?). Then use an abrasive sponge or scrubber (I have homemade ones from grandma), scrub the stain. Lots of elbow grease. Lots.
  3. After your done scrubbing – rinse cutting board off and wipe vigorously with a wet dish towel. Like you’re washing a dish. Then wipe down and dry. It’s important to DRY it well, sitting water could warp your cutting board.
3.5.3208

TA-DA! It worked awesome at removing the stains from my cutting board. I do still had some remnants of strawberry on my board but it’s very faint. I decided I better save some elbow grease for the other cleaning I have on my list today – but I bet if you were determined this technique could get any stain out.  I bet you could also use some white vinegar – it would add a bit more of a disinfecting quality.

In the future, I’ll save myself the hassle and use a plastic cutting board for those fruits that are more likely to stain my cutting boards. Lesson learned.

How do you clean your cutting boards? How do you remove stains from your wooden cutting boards?

I got this tip from Food.com – they recommend using salt or baking soda, but I recommend using both! 

Comments

Filed Under: Recipes

Homemade play dough using Kool-Aid or Jell-O (preschool teacher and kid approved!)

Shared June 18, 2016

pastry-wheel-play-dough

My friend Zene (a preschool teacher) makes the BEST play dough. It smells amazing. It’s the best texture. It’s easy to clean-up. And, it’s very FRUGAL and easy to make.

So I had Zene write up a post for you so you could become a homemade play dough pro, too:
As a preschool teacher, I make a few batches of play dough each year. Last year I made nearly 25 for a preschool conference being held at our school. Being frugal with play dough will pay off. Not only will you be able to make more batches, but you will be able to experiment with different colors and smells! My son’s favorite is blue. We like to use the blue raspberry flavored Jell-O for blue play dough. My preschool kids like any color, especially if it smells yummy!

Add color, smell or pizzazz to your play dough – Kool aid is the most inexpensive way to color AND add scent to your play dough. I prefer two packets for the most vibrant color. For my preschool conference I wanted a large variety of scents and used a cheap mango flavored Tang mix from Grocery Outlet that our family never got around to drinking. It was great for the play dough and smelled yummy! If you have extra drink mixes laying around (think Crystal Light, single use water flavorings, etc.) use them for play dough. If you are the type that doesn’t normally buy gross dye and sugar laden drink mixes, not to fear, use baking extracts. Orange, almond, rum at Christmas, use your imagination. Another great add-in is glitter. We like to put glitter in our green play dough in December, and in our white play dough in January. It adds depth and pizazz.

Play dough toys, tools – Play dough toys are a must, but they certainly don’t have to be bought. Break out the cookie cutters, rolling pins, spoons, potato masher, cups, melon baller, corn cob skewers, tooth picks, small toys to bury, use a butter knife for chopping, etc. You will be jealous that your kids get to have all the fun. Just beware of containers with little openings, play dough is really tough to fish out.

Clean-up tips – If you are worried about the kitchen table use a plastic table cloth or cutting board, but play dough wipes off very easily. Does your child wander around the house with play dough or does he/she stick it in weird places? That’s okay! As a preschool teacher, I’ve seen it all! There is no need to worry about play dough on your carpet. 75% of my preschool room is covered in carpet and we have NO play dough on it currently. It ALL comes off the next time you vacuum. If you find play dough on your carpet, pick up any large pieces, let it dry and vacuum. If there are any pieces left over, pick at it a bit with your finger or a butter knife and it will come right off. Play dough eventually dries and shrivels, so if it gets stuck in the tub faucet, outlet, belly button, it will come out. I had a preschool student stick it in her nose once, luckily at her own home! Doctors orders were to just wait till the nose cleaned itself out. This play dough happened to be bright green ? and all of it did come out.

Homemade Play Dough
 
Save Print
Author: Heather
Recipe type: Other
Ingredients
  • 1 cup flour
  • 1 cup water
  • 2 tablespoons oil (vegetable, canola)
  • ½ cup salt
  • 1 teaspoon Cream of Tartar
  • Food coloring, Kool Aid, Jell-O or other colorful mix (prefer two packages of Kool-Aid for best color)
  • 1 quart-sized Ziploc bag for storage
Instructions
  1. This is FAST and HOT so kids will not be able to help with this part. Mix ALL ingredients in a large pot stirring constantly over medium-high heat. You will need to keep the mixture moving so it doesn’t burn or cook unevenly. Stir until the dough pulls away from the sides. Turn off the heat and keep the pot ON the burner. Keep stirring the dough until it forms a ball. Remove dough from heat and let it cool to a comfortable touch. Don’t worry if there are small clumps of flour, they will knead out.
3.5.3208

Heather’s Note – I grew up with my mother making our play dough, so I have a special place in my heart for it. I wanted to give this recipe a test run, so I made two batches yesterday (would have made more but ran out of salt!). My first batch I got distracted chatting with my sister on the phone and it got a little hot before I could stir it up – so I had more flour balls that needed to be worked in by hand. My second batch was at a lower heat with my undivided attention and it turned out PERFECT. I’m thinking it would be fun to make up a series of colors and wrap them up with some fun tools as a Christmas gift!

If you have alphabet cookie cutters it can be a great way to have your kids practice their letters while also playing. I have a funny story about these cookie cutters pictured above – they came in a box of 100 cookie cutters that I bought in college. Yes, I bought a box of 100 misc. cookie cutters because I was looking for a heart cookie cutter to make heart-shaped cookies for my boyfriend at the time. I couldn’t find a heart cookie cutter (sold by itself) ANYWHERE in town – so I ended up buying a box of 100 for that one little heart cookie cutter inside. Not exactly frugal – but hey, I was in love. ? Little did I know that someday that boyfriend would become my husband and that I’d end up using those cookie cutters to play with our son. ? Okay – all at once, everyone say “Ahhhhh. . ..”

i-love-you-play-dough

And while you are “ahhing” . . . this photo of my son is one of the many Mom-ents when I find myself caught off guard and get all teary-eyed and sentimental. I quickly forget all the Legos I step on or the messes I clean up. But I just stop and thank God for my blessings and my babies – who don’t seem to be staying babies very long. The days can sometimes be long – but the years sure do seem short. I’m so glad I captured it on camera, thanks for letting me share.  . . I’m gonna go grab a tissue. . .

I’d love to hear from you if you make this recipe or you have other ideas for fun with play dough!

p.s. If you like this post please “share” it with your friends – you can use the icons at the bottom of the post to share on Facebook, Twitter, carrier pigeon (just kidding) – but I appreciate you sharing. ?

Comments

Filed Under: Recipes

Homemade Hummingbird Food (Nectar)

Shared June 18, 2016

Photo taken in my backyard! I have feeders everywhere. This recipe works like a charm.

Photo taken in my backyard! I have feeders everywhere. This recipe works like a charm.

I love the satisfaction of spotting a hummingbird. They are such fast little buggers that you barely get more than a buzzing over your head as they fly to their next sweet spot. My friend gave me a homemade hummingbird nectar recipe many years back – and it works like a charm at beckoning these long-beaked beauties. The birds love the nectar, it’s simple and frugal to make, and it is safe for the birds (unlike some of the red colored packaged stuff from the stores).

Homemade Hummingbird Food (Nectar)
 
Save Print
Author: Heather
Recipe type: Other
Ingredients
  • 4 cups water
  • 1 cup white sugar
Instructions
  1. Boil water, add sugar, stir until dissolved.
  2. Don’t boil too long – it will change the ratio of sugar to water. You want a ratio of four (4) parts water to one (1) part sugar. So you could do 2 cups water and ½ sugar, if you wanted or any quantity that follows the ratio.
  3. Wait for it to cool and add to feeders. If you have leftovers, keep in fridge for up to two weeks.
  4. Don’t add food coloring – it can be harmful. I’ve found red feeders with clear nectar are very effective without adding extra colorings. Also placing the feeder near flowers and/or greenery – the birds like a quick escape into a tree or brush. Try to avoid spilling – or else you’ll be in the business of attracting ants.
3.5.3208

Clean your feeders about twice a month to keep build-up at bay. Once the hummingbirds find you – you’ll need to be filling them up about that often anyway! Lowes or Home Depot carry window hooks that allow you to put the feeders on your windows – which is a fantastic way to see a bird. In fact, we had a hummingbird on our feeder throughout most of dinner last night – right on the dining room window. The whole family enjoyed watching it and we were glad he/she joined us for our meal. ?

If you don’t spot hummingbirds right away – don’t fret. Just keep putting out the food and they’ll come once they’ve deemed it safe, promise. Then they’ll come in droves.

My-son-watching-the-birds

And just for fun, I want to share one of my favorite mom memories. This is a photo of my son when he was about 9 months old. Watching the hummingbirds fly around the back deck and sip from the feeder. I can’t believe he’s going to be  seven years old this year. Time flies, almost as fast as a hummingbird. . .

Do you have any secrets for attracting hummingbirds?

Comments

Filed Under: Recipes

Peanut Butter and Jelly Gelato {Kid-friendly recipe}

Shared June 18, 2016

Peanut-Butter-Jelly-Gelato

Peanut butter and jelly – goes together like Max and Ruby or Bert and Ernie. Kids seem to love it. Add gelato into the mix and you have something really special. Recently we made a batch of homemade peanut butter and jelly gelato – and it tasted just like the classic peanut butter and jelly sandwich, but perfect for a hot summer day.

If you have an ice cream maker – making gelato and ice cream is incredibly easy. You make the base ahead of time and let it chill in the fridge overnight. Then, the next day, you throw it into your ice cream maker (we have the Cuisinart ICE-30BC Pure Indulgence 2-Quart Automatic Frozen Yogurt, Sorbet, and Ice Cream Maker) and within 25 minutes you have ice cream. Yes, only 25 minutes.

Of course, you then have to throw it into the freezer for two (2) hours to harden. But really, I think the process is much less work than people think it is!

Peanut Butter and Jelly Gelato {Kid-friendly recipe}
 
Save Print
Author: Heather
Recipe type: Dessert
Ingredients
Plain base
  • 2 Cups whole milk (we used the 2% milk we had in the fridge)
  • 2 Cups heavy cream
  • 4 large egg yolks
  • ⅔ Cup sugar
Additional ingredients
  • ½ Cup smooth peanut butter
  • ½ Cup strawberry jam
Instructions
To make a plain gelato base
  1. Combine milk and cream in a heavy saucepan and cook over medium-low heat, stirring occasionally so a skin doesn’t form. Stir until tiny bubbles start to appear around edges or it reaches 170 degrees F.
  2. While it’s on the stove, in another bowl, whisk egg yolks until smooth. Gradually whisk sugar into it’s well incorporated. It should be thick and a pale yellow.
  3. SLOWLY pour the hot milk into the egg yolk/sugar mixture – whisking continuously. If you pour it in too fast, without whisking, it could cook your eggs – which you don’t want.
  4. Return the whole custard to the saucepan on low heat. Stir frequently with a WOODEN spoon, until it’s think enough to coat the back of the spoon and is 185 degrees F. Do not boil.
  5. Pour mixture through a fine-mesh strainer into a clean bowl and cool at room temperature, stirring every 5 minutes. You can also cool over an ice bath, stirring the custard until it’s cool.
  6. Once cooled, cover and refrigerate until it’s very cold, at least four hours or overnight.
To make gelato
  1. After your base has become very cold in the fridge (at least four hours or overnight) it’s time to make the gelato!
  2. Place the peanut butter into a blender with half of the base. Blend until smooth, then whisk in the remaining base.
  3. Pour mixture into ice cream machine and churn according to manufacturer’s instructions.
  4. This peanut butter gelato is divine. You could stop here and you would probably be happy with it. If you want to add the strawberry jam there are a few ways to do it. We added ½ cup strawberry jam to the gelato, toward the end of the churning time. BUT if I had to do it again, I would layer the peanut butter gelato into a pan, with a layer of jelly on top before freezing. I think mixing the gelato into the churning made the ice cream a little harder to “set up” in the freezer. It still tastes amazing, but it had a softer consistency then I’d like to see. Another option is just adding a spoonful of jelly to the top of your peanut butter gelato scoop, as a topping.
  5. Transfer to an airtight container and freeze for at least two hours before serving.
3.5.3208

How is gelato different from ice cream? Gelato is made with less fat (or cream) and generally has less air. Gelato tends to be richer and smoother.

The Cuisinart ICE-30BC Pure Indulgence 2-Quart Automatic Frozen Yogurt, Sorbet, and Ice Cream Maker has great reviews and is the same ice cream maker that we use (and love)!

This recipe is from The Ciao Bella Book of Gelato and Sorbetto: Bold, Fresh Flavors to Make at Home (Amazon link). Which is one of our favorite recipe books! 

What’s your favorite ice cream flavor? Have you made ice cream (or gelato) at home – if so, do you have any suggestions? 

Comments

Filed Under: Recipes

Spring Cupcake Designs – 6 Easy Spring and Easter Cupcake Designs

Shared June 18, 2016

Sping-Cupcake-Designs

I’m not very good about decorating for holidays or going over the top with cutesy seasonal foods. But yesterday I had a wild hair and decided the kids and I should decorate cupcakes. I think it was the sunshine – it makes me do crazy things. I had fun getting creative with the kids trying to come up with fun Easter cupcake designs for you. They are each 3 steps or less and EASY. We hope you enjoy them!

Step 1 – Your first step is make a batch of cupcakes. You can make them from scratch or make them from a box (like I did, there is only so much you can expect from a girl in one day).

Baby-Chick-Cupcake-Spring-Design (1)

Baby Chick Cupcakes

1.) Frost it with yellow frosting (I used vanilla frosting with couple drops of food coloring)

2.) Dip in yellow coconut. To make colored coconut, put plain coconut in a Ziploc bag, add a couple drops of food coloring, close bag and mix it around until color coats coconut.

3.) Add two eyes. You can use dark colored candies, chocolate chips or I used frosting. Then add a beak. I used a Reeses Pieces.

I actually got this idea from my Parade magazine.

Lindt-chocolate-bunny-cupcake (1)

Lindt Chocolate Bunny Cupcake

1.) Frost it with green frosting. You can get Key Lime frosting in the stores or just make regular frosting and add green.

2.) Dip in green coconut. To make colored coconut, put plain coconut in a Ziploc bag, add a couple drops of food coloring, close bag and mix it around until color coats coconut.

3.) Stick a toothpick in the Lindt chocolate bunny (it should be hollow) and stick it into cupcake. Add a few jelly beans that look like colored eggs.

Peep-Cupcake-Design-Idea (1)

Peep Cupcake

1.) Frost it with yellow frosting (or whatever color will complement your peep)

2.) Cut off the body from the peep. Settle it into the frosting.

3.) Sprinkle with colored coconut. To make colored coconut, put plain coconut in a Ziploc bag, add a couple drops of food coloring, close bag and mix it around until color coats coconut.

Candy-filled-Chick-Cupcake (1)

Candy-Filled Chick Cupcake

1.) Frost it with green frosting. You can get Key Lime frosting in the stores or just make regular frosting and add green.

2.) Put a candy-filled animal-shaped egg in the middle of the frosting. I found Galerie Spring Time Candy-Filled Animal Shaped Eggs. I found them at Safeway. It was about $3 for 16 of them. They came in all shapes – little chicks, bunnies, pigs, cows. They were super cute. I picked the chick.

3.) Cover the rest in green coconut. To make colored coconut, put plain coconut in a Ziploc bag, add a couple drops of food coloring, close bag and mix it around until color coats coconut.

Junior-Mints-Rolo-Cupcake (1)

Junior Mints & Rolo Flower Cupcake

1.) Frost it with yellow frosting (or whatever color you’d like)

2.) Put an unwrapped Rolo candy in the middle.

3.) Then surround it with pastel Spring Limited Edition Junior Mints (the box had pastel blue or yellow inside)

Bumble-bee-flower-cupcake (1)

Bumble Bee & Flower Cupcake

1.) Frost it with blue frosting (use white frosting and add blue food coloring)

2.) Dip sprinkle green coconut on the lower half of the cupcake, like grass. To make colored coconut, put plain coconut in a Ziploc bag, add a couple drops of food coloring, close bag and mix it around until color coats coconut.

3.) Use a pastel yellow Limited Edition Junior Mint and draw bee stripes on it with black frosting. Add a head and stinger. Add a couple flower sprinkles to the grass.

What do you think? Which one is your favorite? They are so easy to make and if someone as untalented, clumsy people as me can make them – you can do it. 

Comments

Filed Under: Recipes

Slow Cooker Caramel using Sweetened Condensed Milk

Shared June 18, 2016

Slow-Cooker-Homemade-Caramel

Who knew homemade caramel was so easy to make? I had no idea until Stephanie sent in this incredibly easy slow cooker recipe.

Slow Cooker Caramel
 
Save Print
Author: Heather
Recipe type: Dessert
Ingredients
  • Sweetened Condensed Milk – You can buy this in a can, but I found it at Trader Joe’s in a plastic bottle, so that’s what I did. It cost about $2.75, so it was not the most frugal choice, but it saved me an extra trip because I didn’t have any at home. And it’s organic, if that matters to you.
  • Yep, that’s it. Only one ingredient!
Instructions
There are a couple ways you can do this. . . .
  1. Method 1 – If you buy condensed milk in a can, which is how most people find it (more affordable, too). Just remove the label off the can and put into your slow cooker. Place it on a plate or in a glass container to keep it from possibly rusting your slow cooker. Fill the slow cooker with water until it covers the cans. Cook on low for 8 hours. Open cans and you have yourself some caramel!
  2. Method 2 (the one I did) – I feel a little weird about cooking things in cans. I’m no BPA expert, but the chemicals in cans make me nervous. So, I decided to pour the sweetened condensed milk into glass canning jars. (This also has the advantage of you being able to watch the coloring as it cooks – so you can decide if it’s done.) Put the lids on the jars. Place in slow cooker, fill with water until it goes over the top of the jars – fully submerged. Cook on low for 8 hours – make sure water does not boil, but just simmers. Open jars and you have yourself some caramel! Plus they are already ready to store in the fridge. *Just because they are in canning jars – doesn’t mean they are shelf stable. We didn’t technically “can” them and they should be refrigerated. ?
3.5.3208

BE CAREFUL – Cans or jars will be hot. Caramel will be hot. Make sure jars are completely submerged in water.  I guess jars can explode if you don’t keep the water level high enough. So keep water level over lids!

Fast forward 8 hours and you have a nice brown caramel!  I actually let mine cook TOO long – it was more like nine hours on low, so it was a bit too done. It wasn’t burned, but I think I would have liked the consistency if I would have taken it out after 7.5 – 8 hours. Just keep an eye on it. Especially keep an eye on the water level – you don’t want it dropping below the lids. 

Carefully remove jars or the cans. It will be HOT. My cans sealed themselves, so I popped the lid and scooped out into single serving bowls with apples. Even if your jars seal themselves, they still need to be refrigerated – they are not properly “canned”.

My daughter LOVED the caramel (could have cared less about apples) and my son just wanted to the apples (he’s a fruit guy, not really so much into sweets). My husband loved both. ?

Serve with apples or whatever you like dipped in caramel (ideas?). 

Comments

Filed Under: Recipes

Slow Cooker Breakfast – Overnight Pumpkin Pie Steel-Cut Oats

Shared June 18, 2016

Slow-cooker-steel-cut-oats

I have tried to make steel-cut oats in the slow cooker before. I’ve been a bit nervous ever since I had to take a chisel to my slow cooker from the last disaster. But this slow cooker pumpkin pie steel cut oats recipe sent in from Brooke worked perfectly!

You will need a slow cooker with a timer and a warming feature to make this recipe. I use theFrigidaire Professional 7-Quart Programmable Slow Cooker (Amazon link) – but any slow cooker with a low and warm setting should work. I cooked them for a total of 7 hours – three hours on low and four hours on warm.

What are steel-cut oats? Steel-cut oats are whole grain groats – the inner portion of the oat kernel. They are also called Irish Oats or Pinhead Oats. They take longer to cook than traditional oatmeal and have a nuttier flavor and are usually more chewy than other oats. A little bit goes a long way and they are very hearty.

Overnight Pumpkin Pie Steel-Cut Oats
 
Save Print
Author: Heather
Recipe type: Breakfast
Ingredients
  • 2 cup steel-cut oats – Try to buy in bulk.
  • 1 can pumpkin puree – I used my homemade pumpkin puree!
  • 4 cups water
  • 2 cups milk – I used one cup skim milk and one cup half and half, since it was in the fridge and needed to be used
  • 2 teaspoons cinnamon
  • ¼ teaspoon grated nutmeg
  • pinch of salt
  • Optional toppings: brown sugar, maple syrup, chopped pecan, butter, crushed graham crackers, raisins, dried cranberries.
Instructions
  1. In a slow cooker, combine all ingredients and set to low heat.
  2. Cover and before going to bed, let cook on low for three (3) hours.
  3. Slow cooker will keep it warm until morning (mine automatically turns to warm for four hours) and the oats should continue to cook (but not burn) all night.
  4. Add your favorite toppings – brown sugar, maple syrup, chopped pecan, butter, crushed graham crackers, raisins, dried cranberries. The basic recipe is an amazing base, but if you want some dynamic flavors you’ll want to add at least some brown sugar.
3.5.3208

The oats were perfect after 7 hours – 3 hours on low and 4 hours on warm. But would probably be fine after 8 or 9 hours, if you’re lucky enough to get that much sleep. If you’re nervous about burning them, you can do what I did – cook the first batch during the day so you can monitor it’s progress and get an idea of how well cooked they are after seven or eight hours.

Comments

Filed Under: Recipes

Grandma’s Homemade Ooey-Gooey Cinnamon Rolls

Shared June 18, 2016

Cinnamon-Roll-Complete

My grandma makes rolls that are out of this world and cinnamon rolls that make your mouth water and your tummy happy. I don’t make the cinnamon rolls very often because they’re addicting and not exactly healthy. But they sure are a treat, so I wanted to share them with you.

You basically start with my grandma’s roll recipe to get your dough.

GRANDMA RAMONA’S ROLL RECIPE
 
Save Print
Author: Heather
Recipe type: Breakfast
Ingredients
  • 2 eggs and water to equal 1½ cup
  • ½ cup butter
  • 1½ teaspoons salt
  • ¼ cup sugar
  • 4 cups flour (my Grandma prefers Gold Medal, I use whatever is on sale)
  • ¼ cup powdered milk
  • 2 teaspoons rounded yeast
  • ½ cup honey
  • ¾ cup brown sugar
  • 1 tsp of cinnamon (more or less to taste)
Instructions
  1. Add two eggs to a big measuring cup, add warm water until the level reaches 1½ cups. Pour into bread machine (see bread machines on Amazon).
  2. Add butter (I warm mine first), salt, sugar, flour and powdered milk to bread machine – in that order
  3. Make a well in the top of your ingredients and add your yeast
  4. Turn the bread machine on dough setting (this just makes the dough, it doesn’t bake it)
  5. My bread machine takes two hours.
  6. After dough is done, take it out of bread machine and set it on counter, cover and let rise for 30 minutes, covered. Should look a little something like this when it’s done:
  7. Now that you have your dough ready – here’s what you need to do to make cinnamon rolls:
  8. Get some serious counter space (clean) and roll out your dough into a big rectangle. It’s doesn’t have to be perfect, mine kinda looked like the state of Washington. I didn’t measure it, sorry – but I’m guessing 20-24 inches wide and maybe 16 inches tall? Just guessing here – but basically you want to make a pretty big rectangle.
  9. Now that you’re dough is rolled out, you need to cook up the gooey insides. . .
  10. On the stove top, in a sauce pan, combine honey, brown sugar, and cinnamon.
  11. Heat on low heat until gooey. Be careful not to let it burn.
  12. Meanwhile, in the microwave melt about a half-stick of butter and preheat your oven to 350 degrees.
  13. Using a silicon brush (or your clean hands) spread the melted butter out onto the dough. Then spread out the gooey brown sugar and honey mixture. If you want nuts – add those too. I like to think of it as one big party.
  14. Then we get to the “roll” part of the cinnamon roll. Start on the long end closest to you and you will start to tightly roll up the dough onto itself.
  15. Roll it all the way up. You should end up with one HUGE roll. Find the very middle of the roll and cut it straight through. I use a pastry thingy but a knife should work just fine. Once you’ve cut in the middle you should have two long pieces – cut those two pieces both in half. Now you have four pieces – cut those both in half, and so on.
  16. You should end up with about a 12-15 rolls and by cutting it this way (middle, then halves of each) – they should be all about the same size.
  17. Then you are going to take a greased baking pan. I used my Pampered Chef baking stone dish (about 9×13) and you’re going to lay each roll out. The two little end pieces that you cut off the roll, can be squeezed together in a corner. You are getting so close!
  18. Then bake this puppy for about 30 – 35 minutes at 350 degrees or until the tops look golden brown. . .
  19. Then for the fun part. . .while it’s still warm, you’re going to put a cookie sheet on top of this. Wear oven mitts and be very, very careful.
  20. And then you’re gonna wanna flip it. All that gooey goodness that seeped to the bottom of the baking dish is now covering your rolls. Ta dah!
3.5.3208

If you must, let it cool before eating. These are great to make and share with friends and neighbors. My mother-in-awe (yes, she is awesome) is watching the kids this weekend so we can get some yard work done (fun, fun) – so I sent a batch with the kiddos. My grandma freezes hers and you just take them out to thaw and pop them in the microwave for a short time to get them gooey again.

I hope you enjoy them as much as we do. . . .

Does your family have favorite recipes from Grandmas or Grandpas? Do you have a favorite breakfast recipe you’d like to share?

Comments

Filed Under: Recipes

Tricia’s Heavenly Sweet Tea

Shared June 18, 2016

Tricias-Sweet-Tea-Recipe

This is a delicious summer drink. Every time I make this for a gathering, I get all kinds of oohs and ahhs. It’s definitely going to make you think twice about buying bottled tea again.

I was lucky enough to get the recipe from a wonderful gal, Tricia, who goes to my church and it’s one of her family recipes (don’t worry, I got permission to share). I bet after you try it, you’ll find it a recipe worth passing along as well!

Tricia’s Heavenly Sweet Tea
 
Save Print
Author: Heather
Recipe type: Beverage
Ingredients
  • 6 Lipton Tea Bags
  • 2 springs fresh mint
  • 1 cup granulated sugar
  • 1 (6 oz) can of lemonade
  • 2 (11.5 oz) cans Apricot Nectar (find this in juice aisle, I prefer Kern’s Apricot Nectar about $1.25-$1.50 a can)
  • 2 tsp almond extract
Instructions
  1. Place teabags and mint in a pottery or glass pitcher and pour in two (2) cups of cold water. Bring a kettle with three (3) cups of water to a rolling boil. Pour boiling water over teabags and cover with a small plate (or lid), steep for 10-15 minutes. Remove the teabags and mint and add the sugar, until dissolved, continue to add the remaining ingredients and three (3) additional cups of water. Server cold over ice.
3.5.3208

Let me know what you think!

Comments

Filed Under: Recipes

Pumpkin Pie Spice French Toast

Shared June 18, 2016

Pumpkin-spice-french-toast-recipe

I’ve seen a lot of pumpkin flavored french toast recipes. Most call for pumpkin puree. But this recipe. . . it trumps them all because you get the pumpkin flavor without the extra hassle of canned puree.

This Pumpkin Spice French Toast recipe uses International Delight Pumpkin Pie Spice Creamer in place of the milk or cream. The creamer gives it the perfect pumpkin pie flavor (not over-the-top) and it could not get easier to make. And I love the way the creamer creates a caramelized effect on the bread – it really is perfect for this.

And for those of you who are lactose-intolerant using International Delight creamers for recipes in replace of the milk is a great option!

Pumpkin Pie Spice French Toast
 
Save Print
Author: Heather
Recipe type: Breakfast
Ingredients
  • Bread, thick cut
  • 1 Cup International Delight Pumpkin Pie Spice Creamer (also available in sugar free)
  • 3 large eggs
  • ¼ teaspoon ground nutmeg
  • ¼ teaspoon ground cinnamon
Instructions
  1. In a large bowl whisk together your eggs, creamer, nutmeg and ground cinnamon
  2. Pre-heat a griddle or skillet and add non-stick spray or butter.
  3. Pour batter into a low edged bowl, big enough for a slice of bread. Soak bread in egg mixture. Flip to soak from the other side.
  4. Place slice of bread into pre-heated skillet and cook on both sides until golden brown.
  5. Serve hot with maple syrup, fresh fruit, powdered sugar or whatever you prefer. I think it tastes good enough to eat plain!
3.5.3208

What’s your favorite way to make French toast? 

Comments

Filed Under: Recipes

  • 1
  • 2
  • 3
  • …
  • 17
  • Next Page »
Happy-Hive-About

Recent Posts

  • How to Clean Stained Cutting Board {Naturally}
  • Homemade play dough using Kool-Aid or Jell-O (preschool teacher and kid approved!)
  • Homemade Hummingbird Food (Nectar)
  • Peanut Butter and Jelly Gelato {Kid-friendly recipe}
  • Spring Cupcake Designs – 6 Easy Spring and Easter Cupcake Designs

Recent Comments

  • Jana Miller on Cottonwood, Jerome, Sedona, Prescott, more {Arizona}
  • Sue Eichler on Cottonwood, Jerome, Sedona, Prescott, more {Arizona}
  • Paris Jeske on Earning a living on the road – How we (and others) are making money while we travel full-time
  • Paris Jeske on Earning a living on the road – How we (and others) are making money while we travel full-time
  • Karen on Healthcare benefits on the road – We break an arm and end up in emergency room!

Recent Posts

  • How to Clean Stained Cutting Board {Naturally}
  • Homemade play dough using Kool-Aid or Jell-O (preschool teacher and kid approved!)
  • Homemade Hummingbird Food (Nectar)
  • Peanut Butter and Jelly Gelato {Kid-friendly recipe}
  • Spring Cupcake Designs – 6 Easy Spring and Easter Cupcake Designs
This error message is only visible to WordPress admins

Error: No feed found.

Please go to the Instagram Feed settings page to create a feed.

Copyright ©2025, A Happy Hive. All Rights Reserved. Custom design by Pixel Me Designs