A Happy Hive

The best in savings, home, food and travel

  • Savings
  • Home
  • Food
  • Travel
  • Savings
    • Grocery
    • Print Coupons
  • Your Home
    • Chicken Coops
    • Gardening
  • Food
  • Travel
  • Earn Money
  • Rise & Shine
  • About
  • Contact Us

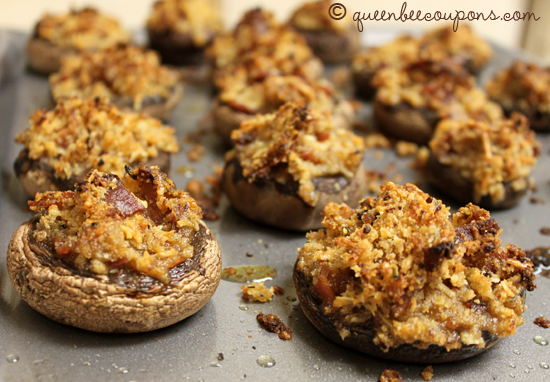
Stuffed Mushrooms

Shared June 12, 2016

Stuffed-Mushrooms

Stuffed mushrooms always look much more fancy than they really are. They are easy to make, relatively inexpensive and the perfect bite-size snack. My husband makes really good stuffed mushrooms so I had him share his recipe with us.

Stuffed Mushrooms
 
Save Print
Author: Heather
Recipe type: Appetizer
Ingredients
  • 15-20 mushrooms – preferably Crimini or a meatier, larger mushroom
  • 6 pieces of bacon – baked and crumbled (or you can fry it up if you prefer)
  • ½ cup bread crumbs
  • ½ cup parmesan cheese
  • ½ onion or shallot (diced)
  • 3 or 4 cloves of garlic (minced)
  • 2 tablespoons butter
  • 2 tablespoons olive oil
  • 2 teaspoons italian herb seasoning
  • Parsley to taste, fresh or dried
  • Optional – blue cheese, crumbled
Instructions
  1. Preheat over to 375 degrees F..
  2. Remove stems and clean mushrooms
  3. Saute onion/shallot in garlic, butter and ½ of the olive oil.
  4. When the onions are translucent, add parmesan cheese, bread crumbs and herbs.
  5. Stir for 15-30 seconds – transfer contents to mixing bowl. Add blue cheese (if using) and bacon. Stir until combined.
  6. Scoop mixture into mushrooms – about 1 tsp in each (or more depending on size of mushroom).
  7. Lightly drizzle olive oil over mushrooms.
  8. Bake on baking sheet for 20-25 minutes until tops are golden brown.
3.5.3208

Hope you enjoy this recipe. Thanks to my husband for his recipe and for making the mushrooms for the sake of this post (we gladly taste-tested them again for you).

What’s your favorite appetizer? 
 

Comments

Filed Under: Recipes

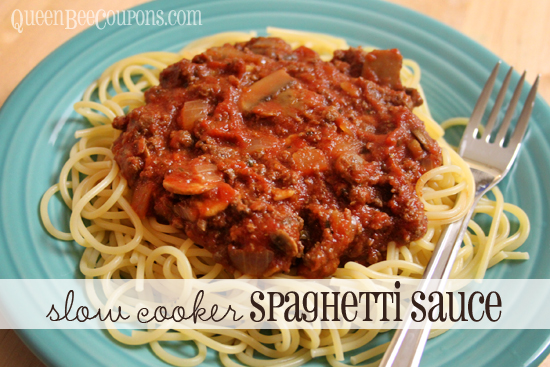
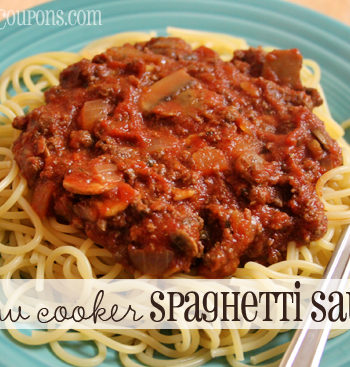
Slow Cooker Spaghetti Sauce with Mushrooms

Shared June 12, 2016

Slow-Cooker-Crockpot-Spaghetti-Sauce

I know store-bought spaghetti sauce goes on sale with coupon for under $1 quite often but there is something wholesome about making homemade spaghetti sauce. And it really is so easy. And frugal. And you can freeze it! This week I came across some manager markdown mushrooms for $0.99 – when this happens (which isn’t as often as I’d hope), I believe it is a divine message that I should make spaghetti sauce. You see, we like a lot of mushrooms in our sauce and at $3-4 a pound it can cost as much as the meat. So when I find mushrooms on sale that need a loving home – I adopt them for incredibly low prices and introduce them to some tomatoes and meat. Everyone is happy.

I’ve made this on the stovetop before – just as easily as the slow cooker. But I do like the ease of throwing it all in the crockpot!

Slow Cooker Spaghetti Sauce with Mushrooms
 
Save Print
Author: Heather
Recipe type: Dinner
Ingredients
  • 2½ pounds ground beef or ground turkey (I used moose meat from my dad in Alaska!)
  • 1 – 2 onions, diced
  • 3 cloves of garlic
  • 2 – 28 oz cans of heavy tomato puree - You can use tomato sauce or crushed tomatoes depending on what’s available and what thickness you like your sauce
  • 1 – 28 oz can of tomato sauce
  • 16 – 24 ounces of fresh sliced mushrooms - We really like mushrooms in our sauce, so we add a lot. You can scale this back a lot, if you want.
  • ⅓ cup dried Oregano
  • ⅛ cup dried Sweet Basil
  • 1 tsp garlic powder
  • 1 tsp sugar
Instructions
  1. Dice onions. Saute in some olive oil in a saute pan on the stove until softened and slightly brown. Toss onions into slow cooker.
  2. Cook up your meat (ground beef or ground turkey) in a pan on the stove. Cook it until it’s completely browned. Drain any excess fat. Toss into slow cooker.
  3. Add the rest of your ingredients to the slow cooker and cook on medium for 6 hours or low for 8-10 hours. You can’t really mess up the cooking times. It’s all going to be cooked when you add it to the slow cooker, so it’s just a matter of flavors blending and it all coming together!
3.5.3208

I usually make up a huge batch of this and then freeze it into meal-size servings using my Food Saver (see photo above from the last time I made some up for the freezer). Then when we want spaghetti or we need sauce for Eggplant Parmesan or lasagna, we’ll pull it out of the freezer. You just cut the bag open and dump it into the pot to heat it up! Super easy and you know exactly what’s in it.

What do you like to put in your spaghetti sauce? 

Comments

Filed Under: Recipes, Slow Cooker

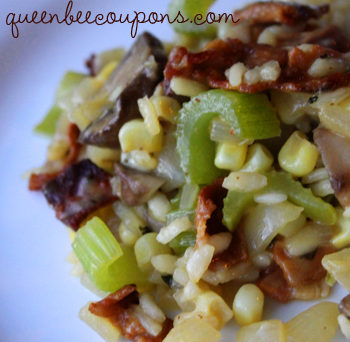
Risotto with Mushrooms, Corn, and Bacon

Shared June 12, 2016

Risotto-bacon-corn-recipe

Risotto is a dish we eat fairly often – because as a rice-based meal it’s fairly inexpensive. It’s also very flexible and you can add all kinds of things to it. One of our favorite ways to make risotto is with bacon, corn and bella mushrooms – which we add liberally so our risotto is a pretty “chunky” variety.

Risotto is made from Arborio rice, which can be kinda spendy if you buy it in the packaged containers at your typical grocery store. But buy it in bulk at Winco or a food co-op and you’ll probably save as much as 50% off the per pound price. I need to check and see if Costco has it, and I understand Winco has it in their bulk section, too. Look for it with the rices.

This is a recipe my husband uses when he makes risotto. He’s the designated risotto maker in the house and he has pretty much mastered it, in my humble opinion. The ingredients you add are really pretty flexible – you could do shrimp, peas, scallops, asparagus, steak – be creative!

Risotto with Mushrooms, Corn, and Bacon
 
Save Print
Author: Heather
Ingredients
  • Arborio rice, about 1.5 cups
  • Chicken broth, 32 ounces (or vegetable broth)
  • Bacon, one 10-12 oz package
  • Celery, 6 or 7 stalks, diced
  • Corn, about 1 cup
  • Mushrooms, baby bella, about 12 ounces
  • Onion, 1-2 onions, diced small
  • Parmesan cheese, about ½ cup, shredded - Don’t leave this out – it’s what makes it creamy.
  • White cooking wine, about ½ cup - Could leave this out if you preferred.
  • Garlic, whole clove, minced
  • Dried basil, about a teaspoon
  • Dried thyme, about a teaspoon
  • Olive oil, about a tablespoon
  • Optional: fresh lemon zest (from the peel of a lemon) – seems to complement it and add a fresh flavor
Instructions
  1. In a sauce pan, pour in chicken stock and bring it to a boil then quickly bring to a simmer.
  2. In another pan, add dice bacon and cook it up. Set aside. Layout on paper towels to absorb some of the grease.
  3. In a large saute pan, add a tablespoon of olive oil (or some bacon grease!) and throw in the onions. Cook onions down for about five minutes and then add diced celery. After two or three minutes add mushrooms. Saute it all together with the garlic.
  4. Once your onions, celery and mushrooms are starting to look like they are cooked down. Add your arborio rice and begin stirring. Don’t stop. Stir until arborio gets a nice light golden color (not burned!) – about five minutes.
  5. Then pour in white wine to deglaze the pan, keep stirring. Just keep stirring. Then nearly immediately afterward, ladle in simmering chicken stock about a cup at a time – don’t add another cup until the first cup has absorbed. Keep stirring. This process is the most important part in making risotto – add the stock slowly and keep the mixture simmering and moving.
  6. After a couple ladles of chicken stock you can throw in corn, peas or lemon zest, if you are including those. Keep adding stock until the rice seems soft, but a little al dente. It should take about 10-15 minutes of adding stock and stirring rice while it simmers.
  7. After rice has softened and stock is absorbed, add basil, thyme and parmesan cheese – until melted and incorporated into dish.
  8. Enjoy!
3.5.3208

Have you made risotto before? Do you have favorite ingredients? I’d love your tips or ideas! 

Comments

Filed Under: Recipes

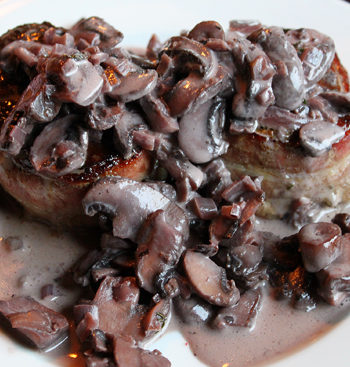
Red Wine and Mushroom Sauce

Shared June 11, 2016

mushroom-wine-shallot-sauce

Today is my husband’s birthday! Everyone say, Happy Birthday Mr. Queen Bee! He’s actually the only reason this site exists – without him being such a staunch supporter and super star dad, this site wouldn’t happen. Plain. And. Simple.

To celebrate another year of him, last night we had steaks for dinner. We got the steaks using a Groupon offer for Omaha Steaks – it’s a great way to get top-quality steaks for nearly 50-60% off. They are really the best steaks and these ones were even wrapped in bacon! Mr. Bee found a recipe for a red wine and mushroom sauce and it was so awesome, I thought I’d share it with you. We hope you like it, too.

Red Wine and Mushroom Sauce
 
Save Print
Author: Heather
Recipe type: Sauce
Ingredients
  • 1 tablespoon unsalted butter
  • Extra-virgin olive oil
  • 2 shallots, minced
  • 2 pounds mushrooms – the recipe suggests wild mushrooms, we used regular ole bella mushrooms
  • Leaves from 2 fresh thyme sprigs
  • Sea salt and freshly ground black pepper
  • ½ cup Cabernet Sauvignon – we bought a cheap $5-6 bottle
  • ¼ cup reserved beef broth (drippings from roast) or low-sodium canned broth
  • ¼ cup heavy cream
Instructions
  1. Place a clean skillet over medium heat.
  2. Add butter and a little drizzle of olive oil. Once butter is melted add the shallots and saute for 2 minutes to soften.
  3. Add mushrooms and thyme; season with salt and pepper. Stir everything together for a few minutes.
  4. Add the red wine, stirring to scrape up any stuck bits; then cook and stir to evaporate the alcohol. When the wine is almost all gone, add the reserved beef juices.
  5. Let the liquid cook down and then take it off the heat. Stir in the cream and season with salt and pepper.
3.5.3208

You could probably serve this over any kind of red meat.

Recipe credit: Red wine and mushroom sauce

What do you like to serve with your steak? 

Comments

Filed Under: Beef, Recipes

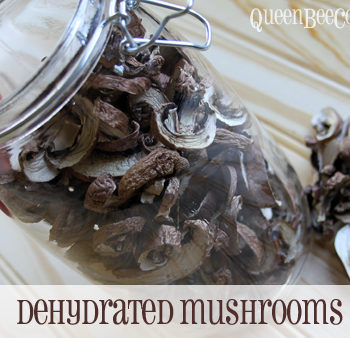
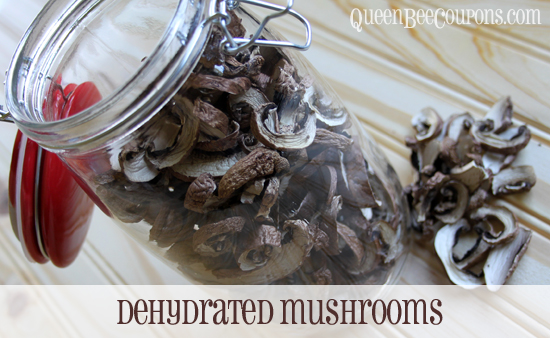
How to Dehydrate Mushrooms

Shared June 11, 2016

How-to-Dehydrate-Mushrooms

Drying mushrooms is a great way to preserve them for later – which is exactly what I wanted to do with the pile of mushrooms in my fridge. This was my first time dehydrating mushrooms and it was incredibly easy – and I’m happy I now have them on hand for soups and sauces down the road.

When researching how to do dehydrate mushrooms I found a lot of disclaimers about dehydrating wild mushrooms you find in nature. If you’re not an expert forager, don’t go eating random mushrooms you find in the woods. If it’s toxic in it’s regular form, it certainly isn’t going to be any safer after drying.

I stick to store bought mushrooms, thank you very much. I might *live on the edge* and buy marked down mushrooms, but that’s as exciting as I get with ‘shrooms. This time I dried some full size portobello mushrooms (manager markdown!) and some baby portobellos (Costco!).

The first thing you’ll want to do is wipe the mushrooms off. Clean ’em up just like you would before cooking with them. I didn’t want to wash or rinse my mushrooms because this would only add moisture, which seems silly right before drying them. I wiped the mushrooms down with a paper towel. I bet if you wanted to rinse them off, it wouldn’t hurt. Just dry them well before dehydrating.

Then you may want to remove the stems. Because portobello mushrooms have a thicker stem – I opted to remove the stem. I saved those for a batch of vegetable broth.Some of the fancier mushrooms I think have a lof flavor in the stem – so you decide if you want to keep it on or not.

Then slice the mushrooms in 1/4 inch slices and spread them out on dehydrator tray.

Dry mushrooms at 130 degrees F for 8 to 14 hours*. I opted for 12 hours. If mushrooms have any moisture remaining in them, could grow bacteria or mold, so I opted for a little longer. They will shrink a lot in the process.

*I saw some sources that recommend drying the mushrooms at 90 degrees F for a few hours and then increasing it to 130 degrees F. But I cannot find any information on why they are recommending this. Anyone know? I just went with one temp, the whole time.

I won’t lie. Drying mushrooms may leave an earthy smell in your house. If you are generally sensitive to mushroom smells, this could bother you. I live near Ostroms Mushroom farm, so I’m used to it. You might not even notice, but I like to give you a heads up.

As with most dried foods, you want to store it in an airtight container away from moisture and light. Places like World Market Cost Plus have inexpensive  pantry jars with sealable lids. These can be labeled and added to your pantry shelf!

How to Rehydrate Mushrooms

I’m not an expert on this since this is my first time dehydrating mushrooms. BUT from what I’m seeing – the best method is to soak in cold water for about 4 hours. You can soak them in hot water to speed up the process, cover the bowl with a plate or lid. Everything I read said to keep the water you use to rehydrate the dried mushrooms, as it makes good stock. I’m planning to use the dehydrated mushrooms in soups, so I’ll just add a little more broth to compensate. If you’re a drying expert, and you know how to rehydrate dried mushrooms, please chime in here!

I referenced these books especially, which I’m guessing you can find at your local library (or Amazon):

  • The Dehydrator Bible: Includes over 400 Recipes (pictured above on my table)
  • The Complete Guide to Drying Foods at Home: Everything You Need to Know about Preparing, Storing, and Consuming Dried Foods (Back to Basics)
  • The Encyclopedia of Country Living, 40th Anniversary Edition <– Love this one! It’s a huge book, 922 pages, it has so much information in it.

As for the type of dehydrator that you need – I think all of them are pretty great. First you can check your local thrift shops, because they are big appliances I think people get tired of storing them and donate them a lot.

I personally have the Excalibur 3900B 9 Tray Deluxe Dehydrator, Black – but it’s probably much more than the average person needs. The only reason I splurged is because I found a crazy good deal that included a lightning deal and a gift card I had. But I have to say that I do love it and it has amazing reviews for a dehydrator.

I’ve been a drying a lot of things lately! See my recent posts:

  • Dried mangoes
  • Dried strawberries

I’d love to hear from you – what do you dehydrate? How do you use your dehydrator? Have you dehydrated mushrooms before?

Comments

Filed Under: Recipes

Hot and Sour Soup

Shared June 11, 2016

Hot-Sour-Soup

I’ve been battling a head cold all week and the perfect solution? Hot and Sour Soup! It’s inexpensive, filling, and it will clear your sinuses. I also love that there are only a few ingredients and it can be ready in 15 minutes (that includes prep time)!

Hot and Sour Soup
 
Save Print
Author: Heather
Recipe type: Soup
Ingredients
  • 4 cup(s) fat-free chicken broth
  • 2 tbsp rice vinegar
  • 2 tsp asian hot sauce, or chili paste, (or to taste, start with a little and add until it seems like it carries the right punch)
  • 2 cup(s) mushroom(s), sliced (I prefer crimini, but white, shitake or any kind of mushroom will work just fine)
  • 9 oz firm tofu
  • 1 tbsp cornstarch, mixed with 2 tbsp water
  • 1 tbsp soy sauce
  • 2 medium scallion(s), sliced
  • optional – ⅓ cup(s) bamboo shoots, sliced
  • optional – egg whites
Instructions
  1. Dice up your tofu, mushrooms and bamboo shoots
  2. In a soup pot, stir together the chicken broth, vinegar, hot sauce, soy sauce, mushrooms, bamboo shoots and tofu.
  3. Bring to a simmer and cook for five (5) minutes.
  4. Stir in cornstarch and simmer two (2) minutes more.
  5. Serve, sprinkling each bowl with sliced scallions.
3.5.3208

Like most of my other recipes – you add more of what you want and less of what you don’t. I love mushrooms – so I add a lot. Tofu regularly goes on sale for $0.99 a container (it seems like it’s on sale a lot at Safeway?) and this can be a great meal to whip up when you find a good deal on mushrooms. I think this soup would freeze just fine.

Let me know what you think!

Comments

Filed Under: Recipes

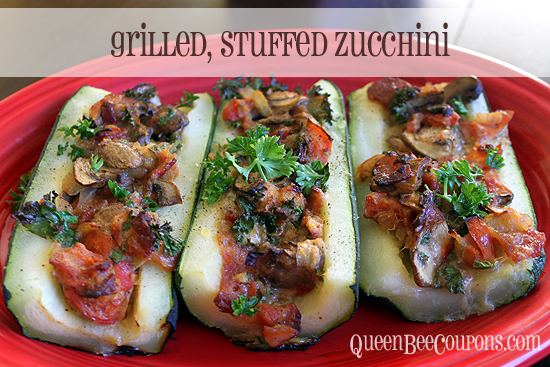
Grilled Stuffed Zucchini

Shared June 11, 2016

Grilled-Stuffed-Zucchini-Recipe

Got zucchini? We do. We’ve been harvesting zucchini from our garden for the last few weeks – and while I was admittedly getting tired of it, this recipe has re-kindled my love for zucchini.

We started with a recipe from Vegetables from an Italian Garden: Season-by-Season Recipes(Amazon), one of my favorite Italian cookbooks. And we modified it to fit our preferences – including adding bacon and grilling, instead of roasting, because it’s just too stinkin’ hot to be turning on the oven.

Grilled Stuffed Zucchini
 
Save Print
Author: Heather
Recipe type: Vegetables
Ingredients
  • 6-7 zucchinis, sliced in half, lengthwise – We used two mondo zucchinis.
  • 1 cup of finely diced onions
  • ½ cup cooked, diced bacon – Original recipe called for ham.
  • 2 tomatoes, diced finely
  • 2¾ cups mushrooms, sliced or diced
  • 1 egg, lightly beaten
  • 3 tablespoons fresh bread crumbs – We just food processed day-old bread
  • ⅔ cup grated fresh parmesan cheese – We used Pecorino Romano, which we get at Costco for a great price.
  • ½ cup parsley
  • 2 cloves minced garlic
  • salt and pepper
Instructions
  1. Wash and half your zucchinis. Toss them into salted, boiling water and let them cook for about 10 minutes. They should just be starting to get tender.
  2. While your zucchini slices are boiling, prep all your stuffing ingredients. Dice everything up. Cook your bacon if you haven’t already.
  3. Once zucchini is al dente (slightly tender) drain it well. Lay them out on a cutting board and let them cool so you can work with them.
  4. Scoop out the flesh of the zucchini with a small spoon. It should scoop out pretty easily, most of it will be seeds.
  5. We re-used the skillet we cooked our bacon in and drained the excess bacon grease (if you don’t want to do this, use a fresh skillet with a tablespoon of olive oil). Saute the onion and garlic. Once your onion is softened, add tomatoes and simmer it down a bit. Add mushrooms and saute until soft.
  6. Take sauteed mixture from skillet and pour into mixing bowl. Add egg, fresh bread crumbs and parmesan cheese. Stir well. It should have a creamy texture.
  7. Meanwhile, spray a grill basket or a grill pizza pan with non-stick olive oil spray. We used a round grill pizza pan – it worked well because it has holes in the bottom which were great for circulation on the grill.
  8. Lay out zucchini halves, skin side down and spoon the stuffing into the zucchini.
  9. Put stuffed zucchini on grill, on medium heat (about 350-400 degrees) for about 30 minutes. Just keep an eye on it. It should get nice and crispy on top. As long as the zucchini is cooked enough for your liking, it’s ready to eat.
3.5.3208

Thanks to Vegetables from an Italian Garden: Season-by-Season Recipes (Amazon) for the inspiration!

p.s. Make EXTRA filling and you could use it for a frittata or omelet for breakfast the following morning – would make two great meals and only one prep!

Let me know if you make these and tell me what you think!

Comments

Filed Under: Recipes

Slow Cooker Egg Casserole

Shared June 11, 2016

Slow-Cooker-Egg-Casserole

Eggs in the crockpot. Who knew? I have a surplus of eggs – so dinner last night was this simple Slow Cooker Egg Casserole. It was a big hit with the whole family – including the kids – and it only took two hours in the crockpot on low!

The possibilities with this recipe are endless, but since we are watching what we eat around here, I opted for feta (instead of cheddar) and Canadian bacon (instead of real bacon).

Slow Cooker Egg Casserole
 
Save Print
Author: Heather
Recipe type: Breakfast
Ingredients
  • 10 eggs
  • 1 cup fat-free milk
  • 10 pieces of Canadian bacon – these are the small round ones from Costco
  • 10 crimini mushrooms, sliced thinly – Any kind of mushrooms will do
  • 1 red pepper, finely diced – I used two small red peppers
  • ½ red onion, diced thinly
  • 2 garlic cloves, minced
  • 1 tablespoon olive oil
  • 3 oz feta (about ¾ cup)
  • ¼ Cup finely shredded Parmesan for topping
  • Optional: Dried basil or your other favorite spices.
Instructions
  1. Heat a Tablespoon of olive oil in a large skillet over medium heat. Saute your diced peppers, mushrooms, onion, garlic and a dash of salt until vegetables start to soften and brown.
  2. Layer the Canadian Bacon along the bottom of the slow cooker. If you prefer – you can dice the Canadian Bacon, but I was sort of envisioning a bottom “crust” – which didn’t actually work.
  3. Pour cooked vegetables on top of Canadian bacon and spread out in a thin layer. Be careful they’ll be hot.
  4. Briskly whisk your eggs and the milk in a separate bowl. Pour over vegetables, spread it evenly.While your vegetables are cooking, get your Crockpot plugged in and turn it on low. Spray the inside of the slow cooker with a non-stick spray or if you’d like you can use butter.
  5. Top with the feta cheese
  6. Cover and cook for about 2 hours. Pay special attention after about an 1.5 hours. It’s really easy to overcook eggs. Depending on your slow cooker and the ingredients you choose, the cooking times can vary. Watch for the middle to “set up” or firm up. You can use a toothpick in the center to feel the consistency of the eggs.
  7. It will close to impossible to pull the whole casserole out of the slow cooker and plate it. It took me some clever maneuvers to do this for photos and there are still areas where it cracked or broke. You might want to consider using some aluminum foil along the bottom with the edges up over the sides, so you can pull it out. Otherwise just spoon it onto a plate.
  8. Garnish with parmesan cheese and enjoy while hot.
3.5.3208

There is a lot going on with this egg casserole. You can add whatever vegetables you have in the fridge. Change up the cheese or meat to add some different flavors.

Due to this only cooking for 2 hours, this isn’t something you can toss in the slow cooker in the morning for dinner at night. You could mix it up ahead of time and put the removable crock in the fridge overnight or during the day – then just pull it out two hours before you’re ready to eat.

Have you cooked eggs in the crockpot before? I’d love to get your recipes or suggestions.

Comments

Filed Under: Recipes, Slow Cooker

Mango Chicken Curry

Shared June 11, 2016

Mango-Curry-Recipe

Last Friday we scored a dozen mangoes at Safeway for only $5. That deal was awesome… almost as awesome as this recipe for Mango Chicken Curry. We made this tonight for dinner and it’s a keeper, in my opinion. This recipe is thanks to Simply Recipes with a few modifications.

I was worried it would be too sweet – but it wasn’t at all! Our mangoes were not overly ripe – so I guess this helps keep it from getting too sweet. I should also add that this recipe is TOTALLY out of our comfort zone. We are experts at ordering curry in restaurants, but never really ventured into making it at home. It is soooo easy and very rewarding to make something new. Our taste buds were grateful.

Don’t be intimidated with these spices – head to your local Winco and pick them up in the bulk bins to save the most. They might also be available at a local co-op or Fred Meyer also has a bulk spice station.

Mango Chicken Curry
 
Save Print
Author: Heather
Recipe type: Chicken
Ingredients
  • 1.5 pounds of boneless, skinless chicken breasts (or thighs)
  • 2-3 mangos, we used three (3)
  • 13.5 oz can of coconut milk – if using lowfat coconut milk, add 2 tablespoons heavy cream
  • 1-2 onions, diced
  • ½ red bell pepper, diced
  • 2 tablespoons vegetable oil
  • 2 garlic cloves, minced
  • 2 tablespoons minced fresh ginger
  • 2 tablespoons curry powder
  • ½ teaspoon ground cumin
  • 2 tablespoon cider vinegar
  • salt and pepper to taste
  • Cilantro for garnish
Instructions
  1. Get a large saute pan – heat oil over medium heat. Add your pepper and your onions and simmer. Stir occasionally until soft (about 5 minutes). Add garlic and ginger and continue to cook for another minute. Add curry powder and cumin and cook for another few minutes. It starts to smell soooo good. If needed add a little more oil to keep it from sticking to pan, but we didn’t worry about it.
  2. Add vinegar, coconut milk and about half of the diced mangoes to the pan. Turn up the head and bring it to a light boil. Lower heat to a low simmer and let it “simmer” for about 15 minutes. Stir occasionally. Remove pan from heat.
  3. Carefully scoop your sauce into a blender. Puree the sauce until it’s smooth. Return sauce to pan.
  4. Add your diced chicken to the pan. Simmer on low, covered for about 8-10 minutes. Chicken should cook all the way through. Check a large piece to make sure.
  5. Throw in remaining mango. If using cream (if you had lowfat coconut milk), add it now. Cook on low temp for another minute or two. Don’t boil or you could curdle your cream.
  6. Taste test. If too sweet, add more vinegar. If not sweet enough, add a little sugar. Add salt, pepper to taste. Garnish with cilantro.
  7. Serve with rice.
3.5.3208

Hope you enjoy this as much as we did! I’d love other suggestions for similar style recipes!

Comments

Filed Under: Recipes

How to Dehydrate Mangoes

Shared June 11, 2016

Dry-mangoes-dehydrate

I just dried mangoes for the first time and they were so awesome, I just had to share!

First you’ll need a batch of ripe mangoes. I bought a box at Costco. They came out to $1 each, which is not super amazing, but not bad either. Here in the Northwest if you can get them for $0.50 – $0.80 that is stock-up talk.

Surprisingly you can’t really tell much about a mangoes ripeness by it’s skin color – it’s best to give them a little squeeze. If they have a little give, I think they are perfect.

Then you peel them. Be careful, they get slippery.  Then slice it into 1/4 inch slices. If you’re not familiar with cutting mangoes, here is a great video from the Mango Board about how to cut a mango.

Cut the cheeks into 1/4 inch thick slices. I did some thinner. It doesn’t really matter what you pick – but the thicker they are, generally the longer they take to dehydrate and the chewier they might be.

Then I had adorable, baby girl hands {not required} that picked up the slices and moved them to the dehydrating tray. My two-year-old loves puzzles, so this was actually an awesome project for her. She just filled the tray with the shapes.

Fill your dehydrator tray with mango slices. Eat some while you do this.

Then put the mango slices into the dehydrator at 130- 135 degrees F for 10 to 12 hours. You’ll know they are done when they are dry and leathery and still flexible. We had preschool in the morning, so I actually dried mine for closer to 14-16 hours. They were fine, in fact, they were delicious – and crunchy. I don’t think you can screw them up.

Then remove them from racks and eat some, of course.

And then after your full, store the rest (if you have any left) in an airtight container. How you store them is up to you, but try to avoid moisture, air, heat or sunlight. I think jars with a tight fitting lid work great!

My kids LOVE eating fruit – and they devoured the dried mangoes and strawberries. I think I’ll be using this as a great way to pack healthy snacks in the car. No way am I packing sticky mangoes or mushy strawberries as an on-the-go snack, but these would be fantastic tossed into a baggie for the car.

I’m not an expert at this by any means. I referenced these two books especially, which I’m guessing you can find at your local library (or Amazon):

  • The Dehydrator Bible: Includes over 400 Recipes
  • The Complete Guide to Drying Foods at Home: Everything You Need to Know about Preparing, Storing, and Consuming Dried Foods (Back to Basics)

As for the type of dehydrator that you need – I think all of them are pretty great. First you can check your local thrift shops, because they are big appliances I think people get tired of storing them and donate them a lot.

I personally have the Excalibur 3900B 9 Tray Deluxe Dehydrator, Black – but it’s certainly a dehydrator on steroids – probably much more than the average person needs. The only reason I splurged is because I found a crazy good deal that included a lightning deal and a gift card I had. But I have to say that I do love it and I’m super impressed.

I’d love to hear from you – what do you dehydrate? How do you use your dehydrator? Have you dehydrated mangoes before?

Comments

Filed Under: Recipes

  • « Previous Page
  • 1
  • …
  • 7
  • 8
  • 9
  • 10
  • 11
  • …
  • 17
  • Next Page »
Happy-Hive-About

Recent Posts

  • How to Clean Stained Cutting Board {Naturally}
  • Homemade play dough using Kool-Aid or Jell-O (preschool teacher and kid approved!)
  • Homemade Hummingbird Food (Nectar)
  • Peanut Butter and Jelly Gelato {Kid-friendly recipe}
  • Spring Cupcake Designs – 6 Easy Spring and Easter Cupcake Designs

Recent Comments

  • Jana Miller on Cottonwood, Jerome, Sedona, Prescott, more {Arizona}
  • Sue Eichler on Cottonwood, Jerome, Sedona, Prescott, more {Arizona}
  • Paris Jeske on Earning a living on the road – How we (and others) are making money while we travel full-time
  • Paris Jeske on Earning a living on the road – How we (and others) are making money while we travel full-time
  • Karen on Healthcare benefits on the road – We break an arm and end up in emergency room!

Recent Posts

  • How to Clean Stained Cutting Board {Naturally}
  • Homemade play dough using Kool-Aid or Jell-O (preschool teacher and kid approved!)
  • Homemade Hummingbird Food (Nectar)
  • Peanut Butter and Jelly Gelato {Kid-friendly recipe}
  • Spring Cupcake Designs – 6 Easy Spring and Easter Cupcake Designs
This error message is only visible to WordPress admins

Error: No feed found.

Please go to the Instagram Feed settings page to create a feed.

Copyright ©2026, A Happy Hive. All Rights Reserved. Custom design by Pixel Me Designs