A Happy Hive

The best in savings, home, food and travel

  • Savings
  • Home
  • Food
  • Travel
  • Savings
    • Grocery
    • Print Coupons
  • Your Home
    • Chicken Coops
    • Gardening
  • Food
  • Travel
  • Earn Money
  • Rise & Shine
  • About
  • Contact Us

Give Stale Bread a New Life = Make Homemade Croutons

Shared June 18, 2016

Homemade-croutons

This last weekend I picked up some sourdough bread from the store bakery. I admittedly paid a pretty penny for it, I was sucked in by the sweet sourdough smell and rustic look. When time came to serve it with our homemade clam chowder, we discovered it was the worst. bread. ever. It was as hard as a rock – not just on the outside but all the way through.

So what do you do when life throws you a tough loaf? Make homemade croutons! So easy and so much more delicious than store bought croutons I could see myself hoping I’d come across another stale loaf of bread just to have an excuse to make them again. We sprinkled these onto our leftover chowder and it was a beautiful thing.

Next time you’re at the store you can look for a bread markdown section and give the discounted, stale bread a new life.

Give Stale Bread a New Life = Make Homemade Croutons
 
Save Print
Author: Heather
Ingredients
  • Day old or stale bread
  • Olive oil, enough to give a light coating (1/4 cup?)
  • Salt and pepper to taste
  • Your favorite herbs, to taste: We used basil, oregano, rosemary and garlic
  • Other ideas: thyme, celery seed, parsley, red pepper flakes
  • Optional: Parmesan cheese, minced or powdered garlic
Instructions
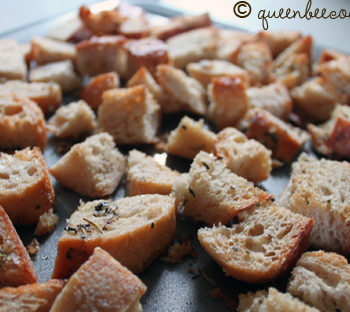
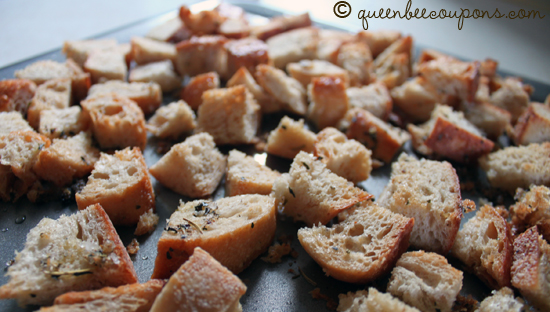
  1. Preheat oven to 375 degrees
  2. Take bread and slice into ½ to 1 inch pieces. Whatever size you’d like.
  3. In a large bowl, mix bread with olive oil, salt and herbs until evenly coated
  4. Spread bread out onto baking sheet and bake at 15-25 minutes or until golden brown. During the baking time, you can use a spatula and flip pieces of bread to get multiple sides crispy and brown.
  5. Put on salads and soups. Store in an airtight bag or container good for about a week, without refrigeration.
3.5.3208

Breadcrumbs are another option for rescuing old bread. What else do you do with it? 

Comments

Filed Under: Recipes

Homemade Hummus Using Dried Garbanzo Beans

Shared June 18, 2016

Homemade-Hummus-Recipe-Carrots

Hummus is one of my favorite dips and spreads – but it can be very hard to find it for less than $2-$3 a container. I usually try to buy it when it’s on clearance or when I have a coupon and can find it under $2. Otherwise, I generally pass it up. So I decided to try and make homemade hummus – it turns out to be much cheaper and I had heard that the homemade stuff beats the store bought stuff as far as flavor goes (it usually does).

I have raved about the book Make the Bread, Buy the Butter a couple months ago and in it there are great instructions for making homemade hummus. I started with dried garbanzo beans, which are much cheaper than canned.

I soaked one pound of dried garbanzo beans over night in plenty of water.  The older your beans, the longer you need to soak them. It’s recommended you buy them from a store that you know rotates stock fairly often because the fresh ones are the best. If I was in a hurry (and didn’t want to soak overnight) I could have done the “quick soak” method which calls for boiling the dried garbanzo beans for two minutes and letting them sit at room temperature for two hours.

The next morning I drained off the soaking water and put the beans in a medium pot, with fresh water and brought it to a boil. I let them simmer for a good 60 to 90 minutes – until fork tender. If you have really fresh garbanzo beans they could be soft in as little as 40 minutes.

Once you have your garbanzo beans ready to go, here’s the hummus recipe:

Homemade Hummus Using Dried Garbanzo Beans
 
Save Print
Author: Heather
Ingredients
  • 4 garlic cloves, peeled (I ended up using five)
  • 4 cups drained cooked chickpeas (garbanzo beans) or you can used canned
  • Some of the liquid from boiling the garbanzo beans
  • 2 teaspoons cumin
  • Pinch of ground coriander
  • 5 tablespoons tahini (You can find tahini in health food departments or you can order it online from places like Amazon or VitaCost. It’s a little spendy – but a little bit goes a long way so it should last you for many recipes.)
  • Juice of three large lemons (I ended up using four)
  • 3 tablespoons good olive oil, plus more if you need it
  • Optional: Paprika sprinkled as a garnish
Instructions
  1. In a blender or food processor (see food processors on Amazon) puree all the ingredients until it’s creamy – give it longer than you think it needs. Make it the consistency you like by adding cooking liquid from the chickpeas and additional olive oil. Add salt to taste and additional lemon juice if you want more of that flavor. Ta da! You have hummus. It’s great with carrots, pita bread, on sandwiches or even spread in these feta, tomato wraps.
3.5.3208

Overall it was a pretty easy process. Soaking the beans didn’t require much effort and I let the garbanzo beans simmer while I was cleaning – so they didn’t require too much attention. I learned I don’t like hummus that is warm – which it is was after they had simmered and then were blended – but after a little time in the fridge I felt like the flavors melded and it most resembled the stuff you’d get at the store – but better!

Although this was the first time I soaked beans for a recipe – I plan to venture into other bean recipes using dried beans. They are so much more affordable than canned beans and can add bulk to your meals without a lot of cost.

I’d love to hear if you have a hummus recipe you enjoy or if you have a favorite recipe that starts with soaking dried beans!

If this kind of things makes you giddy, I recommend checking your local library or Amazon for Make the Bread, Buy the Butter: What You Should and Shouldn’t Cook from Scratch.

Comments

Filed Under: Recipes

White Chocolate Cranberry Delight Cake #IDBaking

Shared June 18, 2016

White-Chocolate-Cranberry-Delight-ID-Baking

White chocolate, cranberry, lemon, pound cake. . . you can’t really go wrong, am I right? This no-bake cake was a big hit at our house this week and because it can be made ahead of time, without using the oven – I think it’s a great dessert for the holidays.

I used International Delight white chocolate mocha creamer to supercharge the mousse. It was my first time “baking” with coffee creamer, but it won’t be my last. The extra flavor in the creamer really came through in the mousse. And with all the International Delight flavors, your biggest problem will be deciding on a flavor to add to your favorite recipe.

White Chocolate Cranberry Delight Cake #IDBaking
 
Save Print
Author: Heather
Recipe type: Dessert
Ingredients
  • White Chocolate Morsels – a 12 oz bag (or about 1.5 cups)
  • International Delight White Chocolate Mocha Creamer – ½ cup
  • Sour cream – 1 cup
  • Cool Whip – 8 oz frozen whipped topping. Thaw beforehand
CAKE
  • 2 frozen pound cakes, about 20 oz
  • I picked up two varieties, because stock was low at my store. I think the Butter Pound Cake was easier to slice and stuck together better.
  • Cranberry juice concentrate – ⅔ cups
  • Lemon juice – ¼ cup
  • Vanilla flavored almond bark (for topping/garnish)
  • You’ll also need a Springform pan – here’s the best selling Springform pan on Amazon.
Instructions
  1. Make your mousse. Combine white chocolate morsels and International Delight creamer in a microwave safe bowl. Nuke it for 1-2 minutes until it’s melted and smooth. Stir often to keep it from burning. I don’t have a microwave so I just set up a double boiler on the stove top – be careful, the steam is hot! Once your mousse is slightly cooled, whisk in your sour cream and then the frozen whipped topping.
  2. Set your mousse aside and let’s get started on the cake part! Trim the crusts off of the pound cake and throw into a bowl. Using your hands crush and smoosh (official term) the crust until you get a nice doughy consistency. Lumps are okay, but not too big. Press the crust into your springform pan, making a flat crust along the bottom of the pan.
  3. Slice remaining pound cake. You want slices about ⅛ inch thick – not too thick! You want about 60 pieces when you’re all done.
  4. Make your cranberry juice. Mix together cranberry juice and your lemon juice in a bowl.
  5. Start making your cake! Take ¼ of the mousse and spread a layer over the crust in the springform pan. Spread it evenly.
  6. Add your first layer of pound cake – arrange about 20 slices on the mousse layer, overlapping slightly.
  7. Brush your layer of pound cake with your cranberry juice solution. Use a basting brush. Let it soak in so you get the flavor, but don’t drench it because the pound cake will pull apart when you’re doing layers if it’s too wet.
  8. Add another layer of mousse! Spread evenly across the pound cake layer. Your first layer is done!
  9. Repeat this two more times, ending with cranberry juice and remaining mousse.
  10. Refrigerate one hour.
  11. Make your chocolate shavings for the top by slightly warming up the chocolate. Take your almond bark blocks and microwave for 20 seconds – do not MELT, just soften. Then use a potato peeler to peel small curls of chocolate off. Sprinkle on top of cake.
3.5.3208

If you’re not a fan of white chocolate I think this recipe could be done with International Delight Chocolate Caramel creamer. Use milk or dark chocolate shavings for the top!

The recipe was inspired by one I saw in Festive Holiday Desserts.

This is a sponsored conversation written by me on behalf of International Delight. The opinions and text are all mine.

Comments

Filed Under: Recipes

Salted Caramel Mocha Cupcakes with Buttercream Frosting #DelightInTheSeason

Shared June 18, 2016

Salted-Caramel-Cupcakes-international-delight

Cupcakes. Everyone loves them, right? Add some salted caramel and chocolate to the mix and you really can’t go wrong. Thanks to International Delight Salted Caramel Mocha creamer I was able to whip up a quick batch of cupcakes – with lots of flavor. Then made some homemade buttercream frosting and some homemade caramel sauce (which, by the way, is easier to make then you think!!!). The whole thing came together beautifully and I think this recipe would be perfect to serve at any holiday gathering!

Salted Caramel Mocha Cupcakes
 
Save Print
Author: Heather
Recipe type: Dessert
Ingredients
  • Chocolate cake mix - I used Super Moist Chocolate Fudge
  • 1¼ Cups International Delight Salted Caramel Mocha creamer - Basically I substituted this delicious creamer for the water in the cake mix directions, check your cake mix to see exactly how much liquid should be added
  • ½ Cup Vegetable oil - Per the cake mix
  • 3 eggs - Per the cake mix
Instructions
  1. Basically you’re going to make your cupcakes based on the cake mix instructions, but instead of water or milk, you will use International Salted Caramel Mocha creamer!
  2. Follow instructions on your cake mix for exact baking times. I baked my cupcakes for 18 minutes at 350 degrees until a a toothpick came out clean from the middle.
3.5.3208

Buttercream Frosting
 
Save Print
Author: Heather
Recipe type: Dessert
Ingredients
  • 3 Cups powdered sugar
  • 1 Cup butter
  • 1 teaspoon Vanilla extract
  • 2 Tablespoons whipping cream
Instructions
  1. In your mixer, using the whisk attachment, mix together your sugar and softened butter. Mix on low speed until it’s all mixed together, then increase to medium and beat for another three minutes.
  2. Add vanilla and cream and continue to beat on medium for about a minute, until it’s the consistency you like!
3.5.3208

Salted Caramel Sauce
 
Save Print
Author: Heather
Recipe type: Dessert
Ingredients
  • 1 Cup brown sugar (packed)
  • ½ cup half-and-half
  • 4 Tablespoons butter
  • a pinch of salt
  • 1 Tablespoon Vanillla extract
Instructions
  1. Mix brown sugar, half-and-half, butter and salt in a saucepan over medium-low heat.
  2. Cook while whisking gently for 5 to 7 minutes until it gets thicker
  3. Add vanilla and cook another minute to cook further.
  4. Turn off the heat, cool slightly and pour the sauce into a jar. Refrigerate until cold.
  5. Drizzle over your cupcakes!
3.5.3208

Professional cupcake decorator I am not. But with these cupcakes, I’m not sure anyone really cares just how perfect they look, since they taste so good. I think these will be a hit at any holiday gathering, what do you think?

Did you know you can use International Delight in replace of milk or water in most recipes? This is especially great for those of you who have dairy allergies!

This recipe is proudly sponsored by International Delight! As a valued partner of International Delight I am compensated for posts such as these. All content, photos, opinions and recipe ideas are solely mine. I’ll be posting a recipe every Friday in November as a way to #DelightInTheSeason

Comments

Filed Under: Recipes

Pumpkin Pie Spice Mini Cheesecakes

Shared June 18, 2016

Pumpkin-Pie-Spice-Mini-Cheesecakes

When it comes to the holidays, my main mantra is keep it simple. To complicate and overthink the holidays is just asking for a package full of stress. No thank you.  I try to stick to a simple meal plan with a few simple splurges so I can spend more time with my family instead of slaving over the stove or trying to master the perfect dessert.

And as far as desserts go – cheesecake is probably at the top of my list. I prefer it over pie or cake. But making it from scratch hasn’t worked so great for me. It usually ends up with the wrong consistency or with a huge crack through the middle of the cake.

So this recipe for Pumpkin Pie Spice Mini Cheesecakes are the perfect solution. They are SIMPLE (less than 4 total ingredients) and so flavorful. It took me under 20 minutes to mix them together and pop them in the fridge – and that includes the time to fill mini muffin cups!

Pumpkin Pie Spice Mini Cheesecakes
 
Save Print
Author: Heather
Recipe type: Dessert
Ingredients
  • One box of no-bake cheesecake mix - Found in the cake mix aisle at your local grocery store. Look for one that calls for milk as the main filling ingredient.
  • International Delight Pumpkin Pie Spice Creamer, 1.5 Cups - Basically I follow the instructions on the no-bake cheesecake mix and substitute International Delight Pumpkin Pie Spice Creamer for the milk! So your quantity might vary slightly.
CRUST
  • Melted butter, 5 Tablespoons - Follow the instructions on the no-bake cheesecake mix for the exact quantity
  • Sugar, 2 Tablespoons - Follow the instructions on the no-bake cheesecake mix for the exact quantity.
Instructions
  1. In a mixing bowl, pour in the package of crust (crushed graham crackers) from the box of no-bake cheesecake mix. Add the specified melted butter and sugar to the crust mix. Stir until it crumbs are evenly coated and moistened.
  2. Place mini cupcake liners in a mini muffin pan (similar to this one on Amazon: Wilton Recipe Right 24 Cup Mini Muffin Pan)
  3. Using a spoon, scoop about a Tablespoon-ish of crust into each mini muffin pan. Using your thumb press down on the crust to get a firm base for your cheesecake. They don’t have to be perfect, have you ever seen anyone critique the looks of crust when they are shoving cheesecake into their face? I think not.
  4. In another mixing bowl, add the package of filling from the box of no-bake cheesecake mix. Add your International Delight Pumpkin Pie Spice creamer and mix according to the package!
  5. Using a spoon, scoop the cream cheese filling into the mini cupcake liners, on top of the crust.
  6. Once you’ve filled all 24 mini cupcake liners, pop the cheesecakes into the fridge and let them chill for at least an hour. I would even consider doing this the night before to have them really set up.
  7. Top with whipped cream, cinnamon, a pecan – whatever you like! I have an awesome recipe for Homemade Vanilla Whipped Cream, with a dash of cinnamon that would really take these up a notch!
3.5.3208

This recipe is so easy and flexible! You could use any flavor International Delight creamer as a substitute for the milk in this recipe and it would taste amazing. I think the Almond Joy, Peppermint Mocha or York Peppermint creamers would all be especially good during the holidays and you can get creative with a topping (like crushed candy canes, chocolate shavings or even mini York mints).

I topped mine with the Homemade Vanilla Whipped Cream and then Pumpkin Spice powder (found in spice aisle), a pecan and/or cinnamon/sugar mix (which I also found in a grinder in spice aisle).

I also made version without the pecan for people who prefer. Although I haven’t tried it, I bet the cheesecakes would freeze just fine (without any toppings) until you’re ready to pull them out?  Let me know if your try this!

Did you know you can use International Delight in replace of milk or water in most recipes?This is especially great for those of you who have dairy allergies!

This recipe is proudly sponsored by International Delight! As a valued partner of International Delight I am compensated for posts such as these. All content, photos, opinions and recipe ideas are solely mine. I’ll be posting a recipe every Friday in November as a way to #DelightInTheSeason

Comments

Filed Under: Recipes

Homemade Vanilla Whipped Cream, with a Dash of Cinnamon

Shared June 18, 2016

whipped-cream-with-vanilla

Once you have homemade whip cream you’ll likely never go back to the whipped cream in a can or tub. A couple nights ago Mr. Q Bee made homemade whip cream with vanilla and a dash of cinnamon – which we subsequently put on grilled strawberries.

Homemade Vanilla Whipped Cream, with a Dash of Cinnamon
 
Save Print
Author: Heather
Recipe type: Dessert
Ingredients
  • 1 cup, heavy whipping cream
  • 2 tablespoons powdered sugar
  • 2 teaspoons vanilla extract
  • ¼ teaspoon ground cinnamon
Instructions
  1. Just beat it, beat it, beat it, beat. . .
  2. Everyone wants to eat it!
  3. Or just whip it. . .whip it good!
  4. Now the directions for real . . .Put heavy whipping cream in a large mixing bowl. Using a whisk attachment or mixer, beat the cream until it forms small mountains or as the experts say – “soft peaks”.
  5. Add powdered sugar, vanilla and cinnamon. Keeping beating until you have “stiff peaks.”
3.5.3208

Serve with any number of things – grilled strawberries, cake, ice cream, espressos or just lick it from the bowl.

Recipe credit: Giada’s Hazelnut and Chocolate Cake with Vanilla Cream

What’s your favorite variation of homemade whipped cream?

Comments

Filed Under: Recipes

Peppermint Mocha Homemade Brownie #DelightInTheSeason

Shared June 18, 2016

Peppermint-Mocha-Brownie-International-Delight

I had never made homemade brownies before this week. And of course I couldn’t make any ordinary homemade brownies, I went for Peppermint Mocha.

Thanks to International Delight Peppermint Mocha creamer these were incredibly easy to whip up and the flavor is amazing! There is an over-the-top peppermint flavor, just enough to make you go, “mmmmmm.”

They had just the right fudge-like dense consistency that I like in a brownie – it can’t be too much like cake, because then, why wouldn’t you just make a cake?

Peppermint Mocha Homemade Brownie #DelightInTheSeason
 
Save Print
Author: Heather
Recipe type: Dessert
Ingredients
  • 2 Cups flour
  • 2 Cups sugar
  • ¾ Cup unsweetened cocoa powder
  • 1 teaspoon salt
  • 1 teaspoon baking powder
  • 1 Cup International Delight Peppermint Mocha Creamer
  • 1 Cup vegetable oil
  • 2 eggs
  • optional: ½ Cup chocolate chips
  • optional: if you really like a minty flavor you could try and add ½ tsp – 1 tsp of peppermint extract to batter. And even consider using mint chips instead of chocolate chips!
Instructions
  1. Preheat oven to 350 degrees
  2. Take a 13 x 9 inch baking pan and grease it with some vegetable oil, make sure it is well oiled or they will stick.
  3. In a large bowl combine all your dry ingredients – flour, sugar, cocoa powder, baking powder, salt. Whisk it together.
  4. In another bowl whisk together your wet ingredients – International Delight Peppermint Mocha Creamer, vegetable oil and eggs
  5. Combine both wet and dry ingredients
  6. Pour into your greased baking pan. Spread out evenly.
  7. Top with about ½ Cup chocolate chips
  8. Pop it into the oven and bake for 30 – 40 minutes. You want a toothpick to come out clean from the middle. For me it was right around 35 minutes.
  9. Remove from oven and cool for 30 minutes before cutting
3.5.3208

Did you know you can use International Delight in replace of milk or water in most recipes?This is especially great for those of you who have dairy allergies!

This recipe is proudly sponsored by International Delight! As a valued partner of International Delight I am compensated for posts such as these. All content, photos, opinions and recipe ideas are solely mine. I’ll be posting a recipe every Friday in November as a way to #DelightInTheSeason

Comments

Filed Under: Recipes

International Delight Iced Coffee Ice Cream Float

Shared June 18, 2016

International-Delight-Iced-Coffee-Float

Summers can be hectic. Trying to fit in as much fun as possible while juggling work, kids, a household – whatever it might be that’s on your plate. Well here’s something for your glass. Something to help you sit back, relax and treat yourself. A creative twist on a summer time favorite this International Delight Mocha Iced Coffee float is easy and it’s adaptable – International Delight Iced Coffee is available in mocha, vanilla, caramel, light and original – so pick the flavor that suits you best.

International Delight Iced Coffee Ice Cream Float
 
Save Print
Author: Heather
Recipe type: Dessert
Ingredients
  • International Delight Iced Coffee - Find it in your local grocery’s refrigerator section
  • Ice cream, a couple small scoops - I used vanilla, but go with ever “floats” your boat
  • Whipped cream
  • Sprinkles
Instructions
  1. Find a nice tall glass.
  2. Add 2-3 small scoops of ice cream
  3. Pour cold International Delight Iced Coffee over your ice cream
  4. Add whipped cream and sprinkles
  5. Find a comfortable chair in the sun.
  6. Sip with a straw or eat with a spoon
3.5.3208

This recipe can also be blended if you prefer more of a mocha coffee milkshake. 

Have you tried International Delight Iced Coffee?  What’s your favorite flavor – mocha, vanilla, caramel, light and original? 

This post is sponsored by International Delight. Whether it’s creamer in your morning coffee or a nice cold cup of iced coffee in the afternoon, International Delight is an affordable treat in your busy day. International Delight is a sponsor of Queen Bee Coupons and as a sponsor, I am compensated for my posts.

Comments

Filed Under: Recipes

Crispy French Vanilla Sugar Cookie recipe, with Peppermint Mocha Ganache #DelightInTheSeason

Shared June 18, 2016

Crispy-Cugar-Cookies-with-chocolate-Ganache

Sugar cookies are a holiday staple. There are a TON of sugar cookie recipes out there – but I like this one because they are easy to make, crispy and you can pick any flavor International Delight creamer you like to add lots of flavor. I used French Vanilla International Delight. As crunchy cookies they are great with a hot cup of coffee, too.

Crispy French Vanilla Sugar Cookie recipe, with Peppermint Mocha Ganache #DelightInTheSeason
 
Save Print
Author: Heather
Recipe type: Dessert
Ingredients
Sugar Cookies
  • 1 Cup butter, softened
  • 2 Cups sugar
  • 2 eggs
  • 1 teaspoon vanilla extract
  • 5 Cups all-purpose flour
  • 1.5 teaspoons baking powder
  • 1 teaspoon baking soda
  • ½ teaspoon salt
  • ¼ Cup French Vanilla International Delight (or your favorite flavor!)
Chocolate Ganache
  • 1 Cup International Delight creamer, your favorite flavor – I used Peppermint Mocha creamer and it went great with the flavor of the chocolate and French Vanilla sugar cookies!
  • 2 Cups Chocolate Chips or any type of chocolate. The nicer the chocolate – the better the flavor!
Instructions
  1. Mix together your butter and sugar until blended. Add your eggs, vanilla and International Delight. In another bowl combine flour, baking powder, baking soda and salt. Mix together the dry and wet ingredients. Cover and refrigerate for 15 – 30 minutes, until it’s easy to handle.
  2. On a floured surface, roll dough out to ⅛ inch thickness. Cut out shapes using your favorite cookie cutters.
  3. Place on greased baking sheet (oruse non-stick baking mats like these)
  4. Bake at 350 degrees for about 10 minutes, until edges are slightly brown. Remove from pan and place on cooling racks.
To make chocolate ganache:
  1. Using a double boiler get your water boiling in the bottom part of the pan.
  2. Pour 1 Cup International Delight into top pan or bowl. Once it’s warmed up, add your chocolate chips. Whisk regularly until creamy. DO NOT OVERHEAT the chocolate will separate and you’ll have a big mess. I’m no chocolatier, but basically you want a low consistent heat to get your chocolate sauce.
  3. Remove from heat. Continue to whisk. Wait until chocolate ganache thickens just slightly and dip your cookies! I dipped half of mine. You can get creative and decorate them with the ganache which ever way you like. You can drizzle ganache over cookies using your whisk or a spoon. If you want sprinkles or crushed candy canes, add them while the chocolate ganache is still warm.
  4. Lay cookies out on wax paper until the chocolate has completely hardened. Since it’s so cold right now, I put them outside to cool down and harden since my kids were waiting to try them.
  5. Enjoy!
3.5.3208

Did you know you can use International Delight in replace of milk or water in most recipes?This is especially great for those of you who have dairy allergies!

This recipe is proudly sponsored by International Delight! As a valued partner of International Delight I am compensated for posts such as these. All content, photos, opinions and recipe ideas are solely mine. I’ll be posting recipes throughout the holiday season as a way to #DelightInTheSeason

(Recipe adapted from Taste of Home Crisp Sugar Cookies Recipe)

Comments

Filed Under: Recipes

Slow Cooker Macaroni and Cheese (with Tillamook cheese!)

Shared June 16, 2016

Slow-Cooker-Crockpot-Mac-n-Cheese

This slow cooker macaroni and cheese recipe is so easy!  It’s not fancy but it is flavorful. And I love that you know exactly what’s in it – as opposed to the boxed stuff. And I used my absolute favorite cheese, Tillamook!

This recipe is from Not Your Mother’s Slow Cooker Cookbook (Amazon) in preparation for Crockpot season – I have really enjoyed the book!

Slow Cooker Macaroni and Cheese (with Tillamook cheese!)
 
Save Print
Author: Heather
Ingredients
  • 1½ cups skim or low-fat milk
  • One 15-ounce can evaporated skim milk
  • 1 large egg, beaten
  • ¼ teaspoon salt
  • Large pinch of black pepper
  • 1½ cups shredded medium or sharp cheddar cheese (I used my favorite, Tillamook cheese!)
  • 8 ounces uncooked elbow macaroni (about 2 cups) – this is HALF the box
  • 2 tablespoons shredded parmesan cheese
Instructions
  1. Coat your slow cooker with nonstick cooking spray. In a separate bowl combine low-fat and evaporated milks, egg, salt and pepper in the cooker and whisk until smooth. Add the cheese and uncooked macaroni – stir it in softly.
  2. Pour mixture into slow cooker and cook on low for 3.5 to 4 hours. Mine was done in only about 2.5 hours! Watch it, you don’t want it to overcook. If you overcook it the sides will burn and dry out.
  3. Sprinkle with parmesan cheese. Enjoy!
3.5.3208

What’s your favorite mac and cheese recipe? 

Comments

Filed Under: Recipes, Slow Cooker

  • « Previous Page
  • 1
  • 2
  • 3
  • 4
  • 5
  • …
  • 17
  • Next Page »
Happy-Hive-About

Recent Posts

  • How to Clean Stained Cutting Board {Naturally}
  • Homemade play dough using Kool-Aid or Jell-O (preschool teacher and kid approved!)
  • Homemade Hummingbird Food (Nectar)
  • Peanut Butter and Jelly Gelato {Kid-friendly recipe}
  • Spring Cupcake Designs – 6 Easy Spring and Easter Cupcake Designs

Recent Comments

  • Jana Miller on Cottonwood, Jerome, Sedona, Prescott, more {Arizona}
  • Sue Eichler on Cottonwood, Jerome, Sedona, Prescott, more {Arizona}
  • Paris Jeske on Earning a living on the road – How we (and others) are making money while we travel full-time
  • Paris Jeske on Earning a living on the road – How we (and others) are making money while we travel full-time
  • Karen on Healthcare benefits on the road – We break an arm and end up in emergency room!

Recent Posts

  • How to Clean Stained Cutting Board {Naturally}
  • Homemade play dough using Kool-Aid or Jell-O (preschool teacher and kid approved!)
  • Homemade Hummingbird Food (Nectar)
  • Peanut Butter and Jelly Gelato {Kid-friendly recipe}
  • Spring Cupcake Designs – 6 Easy Spring and Easter Cupcake Designs
This error message is only visible to WordPress admins

Error: No feed found.

Please go to the Instagram Feed settings page to create a feed.

Copyright ©2026, A Happy Hive. All Rights Reserved. Custom design by Pixel Me Designs